Creating a Bookings Event
Bookings will allow you create a calendar with specific sign-up times such as open houses, parent/teacher conferences, and other events. Please follow these directions to create your Bookings calendar:
1. Log into https://www.microsoft365.com/apps.
2. Click on the Apps button on the left side bar
3. Under the Apps section, click All apps to view apps that are not listed.
4. Click on the Bookings app.
5. Once in the Bookings App, under the Shared bookings pages section, you will see any Bookings pages you have created. Click on the Create bookings page button on the right-hand side.
6. You will be prompted to either Create from scratch or clone from an existing booking page. Select and option.
Create From Scratch
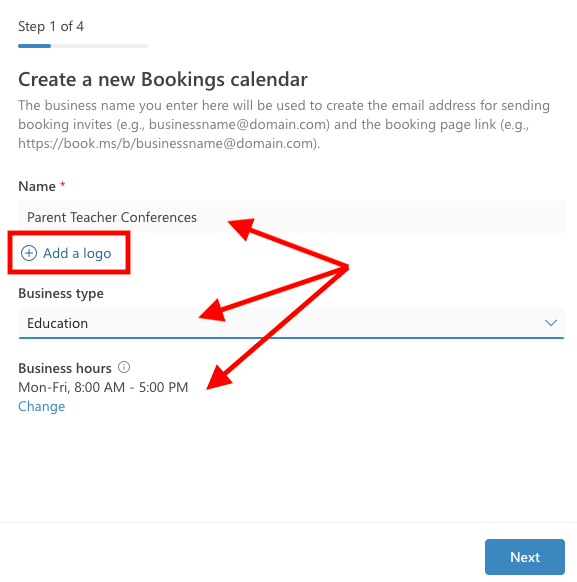
1. Title your event, add a logo if desired, change the business type to Education, and set your business hours. Then click on Next.
2. If you have someone who should help administer the site, you can invite then here. You can also add them later when the site is set up by clicking Next.
3. Skip the Set up a service page by clicking on Next. We will set this up later.
4. On the Choose who can book appointments page, select Anyone if you want people outside the district to be able to access the Bookings page (if you want only SAU19 staff or students to access it, choose People in my organization) and then click on Create calendar.
5. You will receive confirmation that your booking calendar has been created, and this calendar will now be visible on your Bookings app. Click Get started.
Clone From an Existing Bookings Page
To clone a previous Bookings page, select the Bookings page you want to clone. You can edit the specific details later. If will prompt you to select whether you want to clone staff, customers, and services. Only select what you want to be cloned.
Adjusting the Settings of Your Booking Page
Bookings Page
1. Click on Booking page on the left side bar.
2. Under the Default scheduling policy, select the time frame for the conferences, the lead time prior to the conference (when it disables the ability for change to be made to scheduled bookings), the maximum lead time (how many days prior to the event bookings times can be created), and deselect the email notification boxes.
3. Change the General availability to be Not bookable. Set the date or date range for the event and set the available time frame (we will customize this later).
4. Under Customize your page, you can change the template style, color scheme, and check to add a logo to the business page.
5. Under the Region and time zone settings, make sure it is set to (UTC-05:00) Eastern Time (U....
6. Click on Save at the top of that page.
Customers
The customer button will populate on its own when people use your Bookings page to schedule an appointment. If you plan to reuse the Bookings page in the future, you will need to delete all customers after the event.
To edit customers, click the pencil icon next to their name and edit any details you need to edit. Be sure to save any changes you make.
To delete customers, hover over the customer's name and click the trash can icon.
Staff
1. Click on the Staff tab on the left side bar.
2. Click Add new staff.
3. Start typing in the name of the staff member you wish to add, and when it begins to auto-populate, click on the staff member's name. Then click the drop-down menu to determine their role/permissions.
4. Click on the role/permissions you wish to provide that staff member.
5. If you want the staff member to receive an email when a Booking is created with them, leave this option checked.
6. Uncheck Events on Office calendar affect availability, unless you want this option turned on.
Please Note: You can edit a staff member's settings at a later time by hovering over the staff member's name and clicking the pencil icon. Edit any settings you need and then save any changes.
Services

1. Click on Services on the left-hand side.
2. Click on Add new service above the search bar.
3. Turn OFF the Default scheduling policy by clicking on the toggle. Then click on Basic details on the left-hand side, title your event, enter the event details, choose a location for the event, set the duration of each event.
4. Enter the Price for the event (this will most likely be set to Free). Then choose the Maximum number of attendees for each appointment and be sure the language is set to English (United States). Click Save changes.
5. Click on Availability options on the left-hand side.
6. Scroll down to the availability section and use the + button to add the times that are bookable.
7. Click on Assign staff on the left side bar. If you only want one staff member to be assigned to an appointment, click Assign any of your selected staff for and appointment and select your name or the staff members name that the appointment will be assigned to. If you want to assign multiple staff members to an appointment, then select, Assign all of your selected staff for an appointment and then select everyone who will be assigned.
Be sure that Allow customers to choose a particular staff for booking is turned OFF.
8. Click on Custom fields on the left-hand side.
9. Check the circle next to any Customer information fields you want to use and toggle the Required switch to ON if you want them to be required to fill in that information when signing up. If it is not required, leave the toggle switch OFF.
Please Note: Always toggle the email address ON as that is how the appointee will be communicated with regarding the appointment.
10. If you want to create custom fields for any other information that is important to collect, click Add a custom field under the Custom fields section.
11. From the drop-down menu, select either Text question (the individual signing up for the event will type in their response) or Dropdown question (the individual signing up for the event will select from predetermined responses).
Text Question:
Type your question in where it says Question and then click Save changes.
Dropdown Question:
Choose Dropdown question from the drop-down menu and the click Add option. Type in the possible response choice. Continue adding options until you have all the optional choices listed and then click Save changes.
12. After you have added all your Custom field, check the circle next to any you want to include on the Bookings page and toggle the Required switch ON or OFF.
13. If you want to switch the order of the questions or delete a question, click the pencil icon. Then either click the trash can icon to delete it or use the arrows to switch the order. Once completed, click Save changes.
Please Note: You can change the order of the Custom fields, but you will not be able to change the order of the Customer information fields.
14. Click on Notifications on the left-hand side. Turn OFF the Text message notifications and the two Settings notifications by deselecting the boxes. Only check the box to notify the business if you want the business itself to receive and email. This email would need to be listed in Business information section.
15. Customize any Email reminders that you want to be sent about the registration by clicking Add an email reminder. If you do not want one of the messages to be sent, make sure to delete the default message. Choose the timing to send the reminder and enter the message you want to send. When editing the message. You have to click Save Changes in the message area.
16. Customize the Email follow-up message if you want one sent. Click Add a follow-up email. Then select the timing of when to send it and add the follow-up email message and click Save Changes in the message area.
17. Click Save Changes at the bottom of the Notifications screen to save all changes.
Your Bookings Calendar is ready to use. To share the link to your Calendar, click on Bookings page on the left-hand side and click on the copy link icon and paste it in a location for others to access it.
If you need to edit a service, simply click on the Services tab and click on the edit icon, then edit and save your changes.
To add additional services, click Add new service and repeat the steps to set up a service.
If for some reason you see an Office Hours service, simply click on the trash icon to delete it.
Click this link to see how to view your scheduled bookings: https://support.sau19.org/help/en-us/43-bookings/75-how-to-check-scheduled-booking-times.