Courses typically archive within 24-36 hours after the Course Term has ended. Instructors should save Course Materials directly to their personal Resources, which should be done prior to the Course archiving.
Please Note: If you have already saved your Course to Resources in the past, only save the materials you changed. You can also delete the old materials you saved in the past and then complete these steps, so you do not have duplicate materials in your Resources.
To do this, please follow these directions:
1. Log into your Schoology account.
2. Click on Courses from the navigation menu.

3. Click into the Course you wish to save to Resources from.
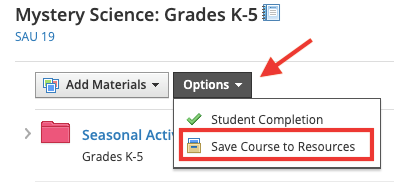
4. Click on Options and then in the drop-down menu, click Save Course to Resources (located in the Materials section of the Course).

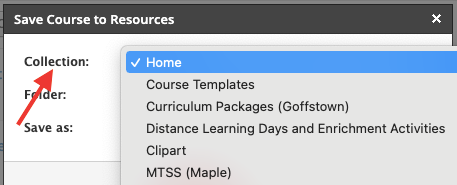
5. Under the Collection drop down menu, keep Home selected. If you have folders set up in your resources, then in the Folder section, you may choose a specific folder to place it into. Then click Submit.
Once the Course finishes the copying process you will see the entire Course saved under Resources.
6. Repeat this process for any Courses you need to save to Resources.
Please Note: Any third-party (Google or OneDrive) Assignments will only copy the directions and not the attached files (assignments that create copies for each student). Once you add the Course materials into your new Course at the beginning of the year, you can just edit the assignments to reattach the files. Embedded third-party links or files that were not added as assignments that create a copy for each student should copy over as long as the right permissions were chosen on the files themselves. No student information or submissions will save to Resources either.
Important: If you are saving assignments created using the old
Google Drive Assignment integration, they will not work after the 2025-2026 school year. You will need to recreate these assignments using the new
Google Assignment integration. Click this link for direction on using the Google Assignment integration:
SAU19 Knowledge Base - Creating Google Assignments - New Schoology Integration.
How to Save Materials from a Course Once it Has Archived
If your Course archived prior to saving the materials, you can access the archived Course by following these instructions:
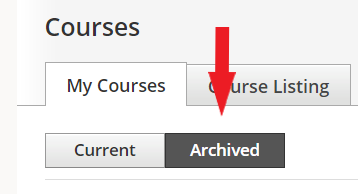
1. Click on Courses from the navigation menu and then click My Courses from the right-hand side.

2. Click on the Archived tab.
3. Click into the Course you wish to save to Resources.
4. Click on Options and then in the drop-down menu, click Save Course to Resources (located in the Materials section of the Course).
Once the Course finishes the copying process you will see the entire Course saved under
Resources.